Sunday, September 21, 2014

Sausage making 101

So, it turns out that watching sausage being made isn't that disturbing after all. A few months ago I was looking for a new challenge with my smoker. I had done smoked meat, bacon, salmon, and of course a killer pork tenderloin. Then my brother-in-law gave me some venison chops he had killed and I got to thinking: Smoked deer sausages sound pretty damn good. 

So i bought a meat grinder for my wife's KitchenAid (Happy Mother's Day baby!) and I put aside a Saturday for "Project Sausage." I decided to go basic the first time around, so I looked up recipes in our copy of The Joy of Cooking, settling on a simple Country Sausage. 

The recipe calls for half pork butt/shoulder and half game meat. So here's about two pounds of diced pork butt and venison -- one-inch squared -- that i've put in the freezer for a couple of hours. I made sure there was a lot of fatty pieces as venison is pretty lean.   


Partially freezing the meat ensures a clean grind, and reduce the chance that bacteria with start to form. Next up was the grinding.  


This part is weirdly satisfying, in a morbid kind of way. I put my meat through twice -- a double-grind. In retrospect, I should have done a third to make the sausages more tender. Live and learn. Step 3 was the seasoning. This is the time to mix in any spices you want to add. The key to this i frying up a little and tasting it to make sure you have the right combination.       


Step 4 was the stuffing. I bought 12 feet of "casings" (aka intestine) at a local butcher. I thought it was a little pricey, but there's a lot of casing in there -- it goes a long way. Pro Tip: store the casing in salted water in a baggy, and put it in the freezer. It'll keep this way for months. 

I then greased up the sausage attachment (that's what He said), slipped the casing on, and started pushing the seasoned sausage mixture through the feed tube. This was very frustrating as a first-timer, but equally as satisfying. I found the meat would get air stuck in it as I was cramming it in the feed tube which would cause the sausages to balloon up -- a simple prick with a knife solved this. But it was still annoying. 


Having watched countless cartoons as a kid that featured sausage links being made I couldn't help but feel a bit crazed -- thus the photo above. After a while I got in the groove. It also helps to have another set  of hands (like a spouse) to help you form the links. 


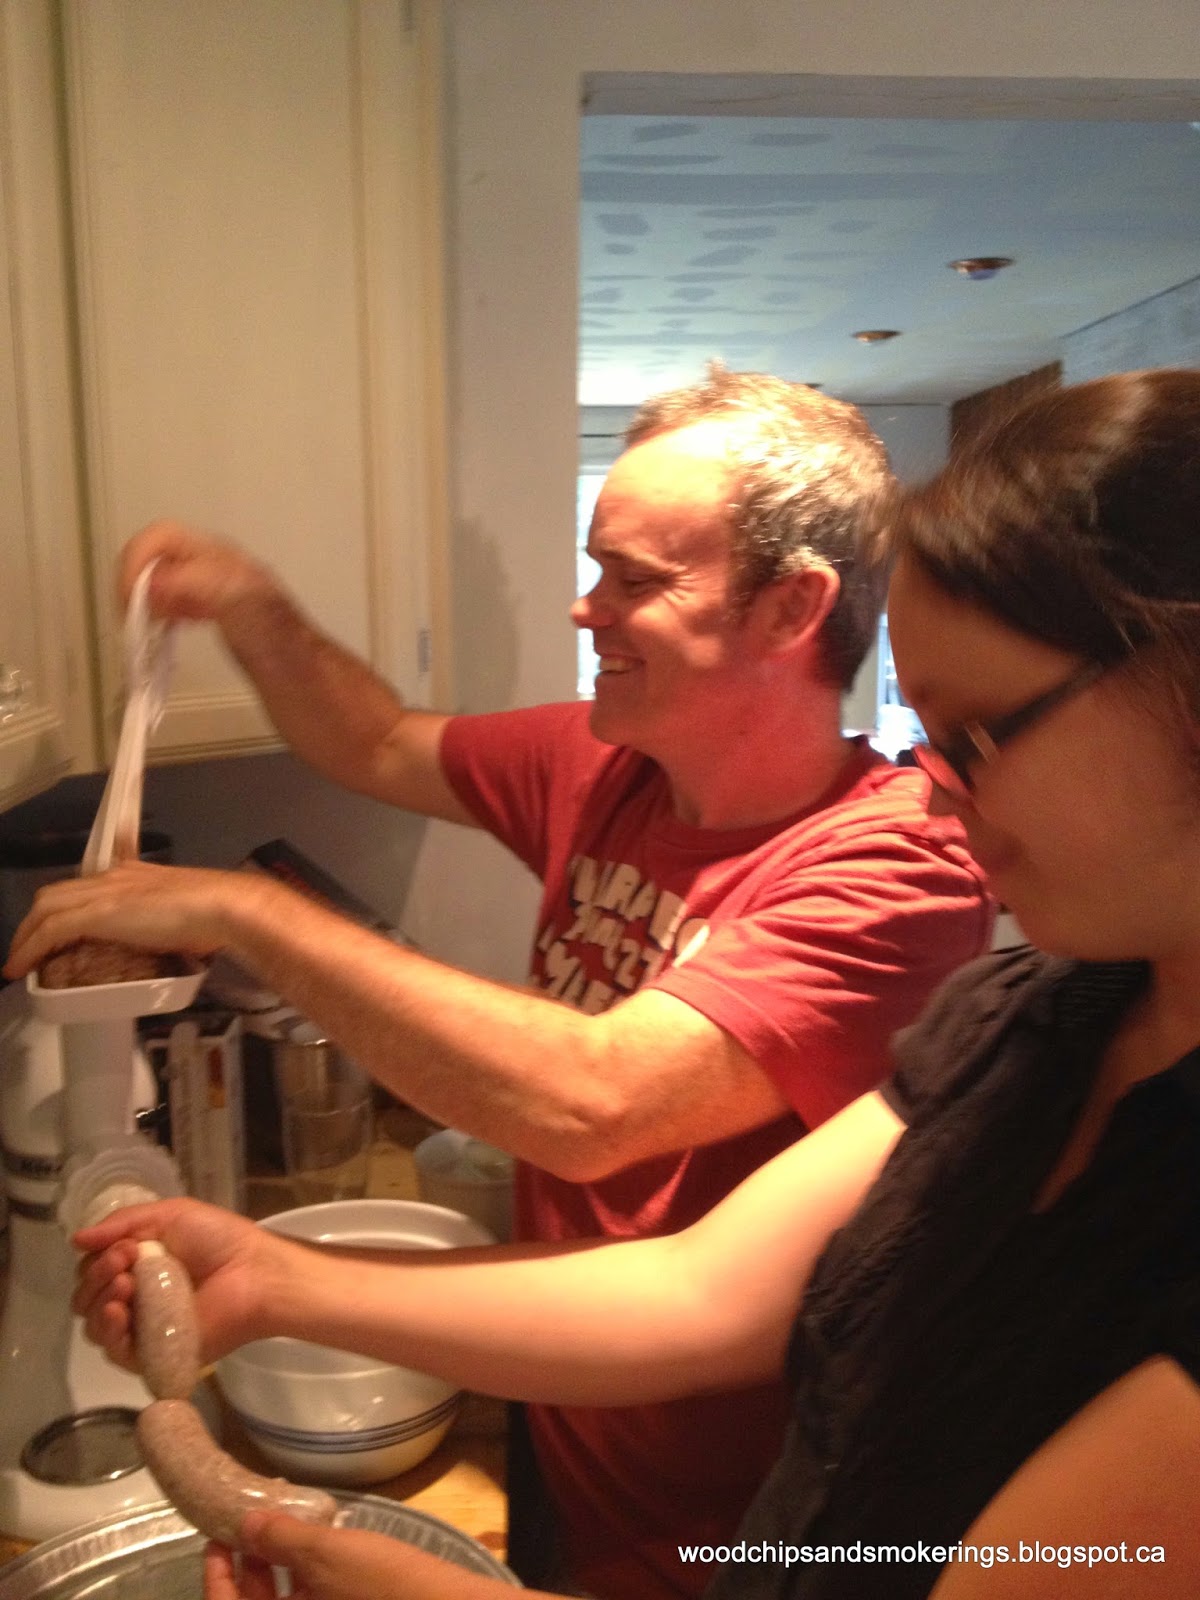
As you can see in the image below, once you get in the groove everything looks pretty polished. The key is to apply slow and steady pressure on the feed tube, then form the links with clockwise, then counter-clockwise, twists. 
 

The end result are pretty good-looking links, no? 


I mean, i missed a few here and there, but that's easily remedied before you place them on the smoker. 


I dropped some maple chunks in and let them smoke for about two hours -- though 90 minutes would have sufficed.
 

Here is the luscious result:


Great colour and superb taste. The great thing about these sausages is that they are ready to eat, but also great grilled. And everyone in my house ate 'em up -- deer or no deer. Was it a lot of work? Sure. Was it a little gross? A little maybe. But the results more than made it worthwhile. Having homemade, 100-percent meat sausage -- no filler -- is a great feeling. The only downside is that it'll be hard to consume those cruddy diner breakfast sausages once you've tasted your own.


Thursday, December 13, 2012

Smoked Meat: Part 2

Talk about a cliff-hanger! Here, some five months later, is the result of the great smoked meat experiment.

As you may recall, this summer I was fiddling with brisket trying to find the right recipe to properly cure a hunk of humble cow meat into a glistening, salty smoked meat. And, it worked! Here are the glorious pics to prove it.


Here's the brisket, just before going in the Smoky Mountain Cooker (and two weeks after sitting in a cure in my basement fridge). 


Here it is, ready to undergo its glorious transformation. I smoked it for seven hours at about 200 degrees Celsius. Sounds time-consuming, I know, but I actually prefer longer smokes. The longer cook time means that small fluctuations in heat have less impact on the final product (unlike a shorter cook, like smoked salmon, where 15 minutes of a really hot flare-up could dry out the fish). 
 

I opted for maple this time around. Mostly because it's local, but also because I'm a patriot at heart. I usually toss two chunks in at the beginning (when the uncooked meat will soak up the smoke best), but in this case I added just one -- cause it was big.  (I also added some berbere that I picked up in Ethiopia last year to the spices included in the cure, because I'm sentimental that way.) 


This pic and the one below were taken at about the half-way mark I think. I know this because there's been some tell-tale evidence of sampling on the business end of the brisket, which usually happens when curious neighbours saunter by lured in by the wafts of spicy smoke. 


And here we are at Hour 7. It's dark and smoky -- with that characteristic red colour. Yum. 


After letting it sit for an hour or so, I steamed it for another hour (yes -- there's another step). I recommend not skipping the steaming if you try this out. It's the traditional way to do it and infuses some much-needed moisture back into the meat. Below are some blurry photos of the finished product. Sorry, but my hands were trembling in anticipation.


Voila. This was definitely the best attempt yet at traditional Montreal style smoked meat. Well-marbled, fatty, and succulent. It was so good, I'm preparing another as we speak to serve as Christmas presents this year. Give the gift of smoke!  
 

Wednesday, July 11, 2012

What are you smoking? Part Two

Howdy. Here's an update on my smoky goings-on. As you can see, the pork belly (all 10 pounds of it) cured wonderfully after five or so days sitting in a mix of spices and herbs.....


The pooled fluid you see here is the excess moisture drawn out by the salt and sugar.


At this point it is now, in effect, bacon. All you really have to do is rinse it well, slice and eat. To gauge it's saltiness I trimmed a piece off, fried it up and gave it to my wife -- who is unerringly honest above all. She proclaimed it too salty, so I soaked it for an hour or so in cold water.

Next up, I rubbed some cracked pepper corn son the four pieces of bacon and placed them in the smoker at about 200 F, along with some chunks of cherry and hickory. 


Note that I left the skin on the bacon (see the piece in the forefront below). I trim this "rind" off later and add it to sauces, beans or chili.


After about 90 minutes on the smoker here's the (almost) finished product.


All that's left is the slicing, which I do on a home slicer I acquired recently. It seems like a small thing, but slicing it with even the sharpest knife can be frustrating and yield uneven slices. 


That's it for now. I'll post an update on my Top Secret Smoked Meat Project in the next couple of days!

Wednesday, June 27, 2012

What are you smoking? Bacon and smoked meat

My original plan a couple of weekends ago was to get some bacon and smoked meat ready for July 1 (or Canada Day as we Canadians call it in Canada, where I live). But then my wife went and had our baby early (Charles aka Charlie, was 7 lbs 6 ounces. And thank you for asking) which scuppered my meat plans. But a handsome healthy baby boy, right? Yay!

Now that he's a week or so old it's time for me to get back to business, which means whipping up some bacon and smoked meat. Each take a while to cure (5-7 days for bacon, two weeks for smoked meat) so I figured I'd offer up a step-by-step process here on the blog.

I know I already featured my bacon recipe here, but I feel like I missed some elements in the process so I'm going to do it again. Plus, I've started selling it by the pound so if you can't stop drooling when you read these posts you know where to go to get your fix. (i.e., Me.)

Here's the curing ingredients (which can be found here) all ready to go...


Here's the raw pork belly (each piece is about 1 kilogram, or two pounds)...


And here's the belly rubbed with the cure ingredients....


And yes, those are juniper berries. One day I'm going to roll up one of these and dry it into pancetta.....if my wife would let me that is. 

Now on to the Mickey Mantle of my smoking repertoire, smoked meat. It took me a few tries to get the hang of this, but man is it worth the effort. Last fall I took some of this on a camping trip in Eastern Ontario and the guys I was with were nutty for it. Even one Montrealer, who declared it better than Schwartz's (take that Celine!).

Anyways, it all starts with the cure/spices. In this case I deployed a mix of pepper, coriander, mustard seed, chili flakes, dill weed, celery seed, sugar, and some berbere (a traditional spice that I picked up when I was in Ethiopia last Fall which I seem to add to everything these days).


I then took the spice rub and mashed it into the brisket, in this case a 12-13 pound whopper.


I then slipped in the fridge in my basement, where it with sit for no less than 14 days, after which it will re-emerge Phoenix-like, into a glorious, luxurious, succulent hunk of meat.

Here's something that's worth saying about the lure of smoking your own meats: it's cheap. That brisket cost me $50, about $9/kg, which is a deal compared to the store-bought slush they try and pass off as smoked meat these days. Even factoring in the shrinkage that occurs in the smoking process, there'll be enough meat on this to make a couple of dozen sandwiches (or a camp full of hung-over men). 

I'll check in one these in the coming week or so and update you on how they're doing. 
  

Friday, June 8, 2012

The Cubano sandwich goes uptown

So what do you do when you have five delicious smoked pork tenderloins and not enough mouths to finish them off? Well, you give some away to friends and family -- then you think up a clever ways to use the leftovers. In my case, this means a twist on a classic street food: the Cubano sandwich.

A Cubano is usually made up of a couple of slices of pork loin, some ham, cheese, and pickles with mustard on a fresh white bun. Yah - it's tasty, but given its All-Star ingredients (two types of pork man!) I always felt it under-performed a bit. With one pork loin leftover from my experiment a few weeks back sitting in the freezer I figured I'd use it as the base for my own spin on the Cubano classic.  

Instead of ham I substituted pancetta, which I cooked up in a grill pan:   
   

Stepping in for the pickle slices was some raddichio, which I grilled as well to take away some of its bitterness.


Next I whipped up  a quick garlic mayo and slapped it all together in a fresh whole-wheat bun. Add a salad (my wife's idea) and a rhubarb soda (my wife's good idea) and there you have it: the Uptown Cubano:


Oops -- forgot the token pickles on the side. Let's try that again.... 


I demand my close-up!:


Humility aside (y'know, because I'm known far and wide for being humble) this is a really, really good sandwich: it's succulent, salty, sweet, garlicky --- and I even forgot to add the avocado which my wife insists would have made this nosh a true All-Star. The Steve Nash of sammys!

Here's the recipe:

Uptown Cubano Sandwich 

One crusty soft white(ish) bun
Three slices of smoked pork tenderloin (recipe here)
Two slices of crispy pancetta
Sliced radicchio
One ripe avocado 
Olive oil
Salt and pepper
1- 2 Garlic cloves (to taste)
Mayonnaise
Pickles

1) Make garlic mayo: chop garlic very fine and mix with about 1/4 cup mayonnaise. Let site for 15 min.
2) Grill pancetta on a grill pan or BBQ; set aside.
3) Slice Radicchio (including core) into 1/2 inch slices. Brush with olive oil and sprinkle with a little salt and pepper.
4) Grill on a grill pan or BBQ until soft and showing grill marks.
5) Slice avocado.
6) Sandwich assembly:
Slice the buns, spread on garlic mayo to taste, add pork, pancetta, radicchio and avocado.
Serve with a pickle on the side, and a lightly dressed green salad.